Building a Personalized Chatbot for My Website: Three Approaches
When OpenAI announced the ability to build your own GPT that can incorporate knowledge from your own details, I knew it would be a great feature to add to my website. I wanted to create a chatbot that would leverage the power of GPT-4 while having knowledge about myself and the projects I work on, ultimately delivering better answers to users.
I’ve seen several questions online and have been asked directly how to create a custom GPT chatbot using the OpenAI API. Before working on this project, I thought creating a personalized chatbot would be as simple as using the OpenAI interface to create an assistant and then embedding it directly into my application. However, I quickly realized that the process was more complex than anticipated, involving several steps beyond just using the admin interface and some level of coding. In my case, I decided to leverage the Google Cloud Platform ecosystem, using Cloud Functions to host the logic that leverages the OpenAI assistant and Dialogflow to build the chatbot. This realization prompted me to explore different approaches and look into the technical aspects of building a chatbot, ultimately leading to the lessons shared in this blog post.
Below, I’ll share the three approaches I explored to build a personalized chatbot for my website and the lessons I learned. The first approach combines OpenAI Assistant, GCP Cloud Functions, and Dialogflow to create a chatbot with custom knowledge. The second approach leverages GCP’s Gemini Pro model, Cloud Functions, Cloud Storage, and Dialogflow for a fully integrated Google Cloud Platform solution. The third approach utilizes Zapier’s chatbot builder, which offers a no-code solution for those who want to avoid coding complexities.
Approach 1: OpenAI Assistant + GCP Cloud Functions + Dialogflow
Following OpenAI’s announcement, I decided to see how I could leverage that technology with the chatbot I wanted to build for my website. After some research, I realized I would have to use OpenAI assistant technology to build a personalized chatbot that can use the GPT-4 model and have details about myself. As I am more familiar with the Google Cloud Platform (GCP) ecosystem, I decided to start by combining OpenAI’s custom assistant with GCP Cloud Functions and Dialogflow.
Here are the steps I followed to build my chatbot using OpenAI, GCP Cloud Functions, and Dialogflow:
Build your assistant using the OpenAI admin interface:
Sign in to your OpenAI account and navigate to the “Assistants” section. I leveraged OpenAI Playground to build the assistant and test the functionality.
Click on “Create” and give your assistant a meaningful name related to your website or services. Provide clear instructions on its purpose, the type of interactions it will handle and choose the model you want your assistant to use.
Upload or enter the knowledge document, including information about yourself, your services, FAQs, and other relevant content.
Test the assistant within the OpenAI interface to ensure it generates appropriate responses.
You can review the OpenAI documentation on getting started building assistants via the API or OpenAI Playground.
Create a Google Cloud Function that calls the assistant:
Set up a new Google Cloud Platform (GCP) project or use an existing one.
Enable the Cloud Functions API for your project.
Create a new Cloud Function with a suitable name and region. Choose the appropriate runtime—I chose Python for this project—and configure the function’s settings. This documentation provides step by step guidelines on how to create your Cloud Functions in GCP.
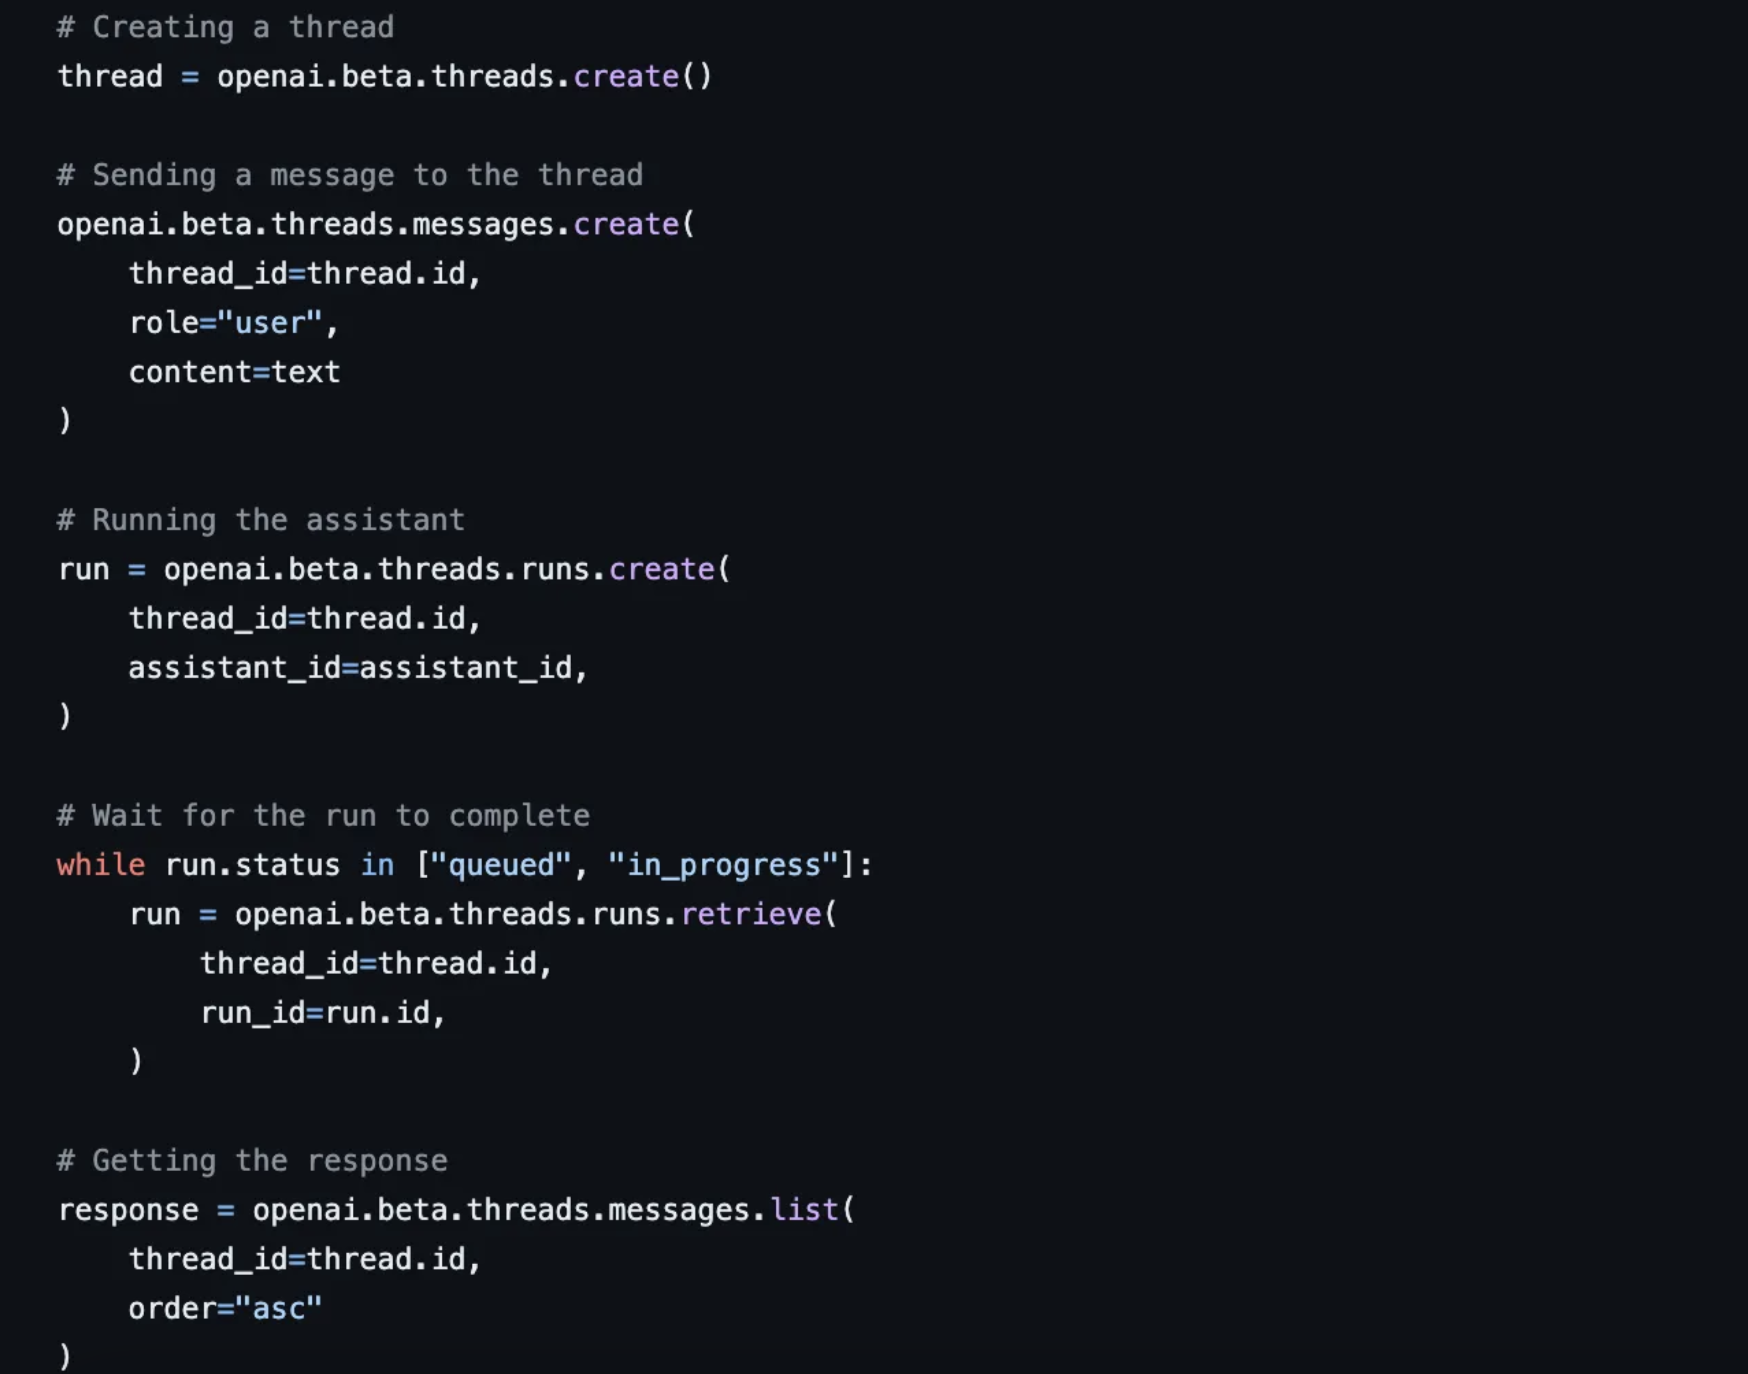
Write the code for your Cloud Function to handle incoming requests from Dialogflow. Below, you will find an extract of the code used:
The exact code can be found in this GitHub repository, as well as the required dependencies file (approach1-requirements.txt).
Set up Dialogflow to call the Cloud Function:
Create a new Dialogflow agent or use an existing one.
Define intents and entities that capture the various user queries and inputs your chatbot should handle. I found this documentation really helpful in figuring out how to configure intents and entities (or even understand those terms).
Configure the fulfillment settings for each intent to enable webhook calls to your Cloud Function. You can find more details on how to do this here.
Test your Dialogflow agent using the built-in testing tools to ensure it correctly passes user inputs to your Cloud Function and receives the generated responses. I used that built-in tool to troubleshoot the webhook, in particular, realizing that Dialogflow webhook responses must be under 30 seconds, which initially caused me issues.
Integrate the chatbot into your website:
In Dialogflow, go to the “Integrations” section and select “Web Demo”.
Copy the generated JavaScript code snippet and copy it to your website. I leverage Squarespace for my website and was able to paste the generated Javascript via “Settings” > “Advanced” > “Code Injection”.
Paste the JavaScript code snippet into the “Header” section and save the changes.
Tips and Troubleshooting:
Ensure your Cloud Function is configured correctly to handle the input and output format expected by Dialogflow. Double-check the JSON structure of the request and response payloads. In the code shared in this GitHub repository, you will find an example of what Dialogflow accepts as a response. I was stuck on this for quite a long time, thinking that the rest of my code was the issue when it was only the response format that was the problem.
Monitor your Cloud Function logs for errors or timeouts. Adjust the function’s timeout settings if necessary to accommodate longer response times from the OpenAI assistant. I found that Duet was quite helpful in troubleshooting the function logs directly from the same ecosystem.
By following these detailed steps and tips, you should be able to successfully build and integrate a personalized chatbot using OpenAI, GCP Cloud Functions, and Dialogflow into your Squarespace website, as I did.
Approach 2: GCP Gemini Pro + Cloud Functions + Cloud Storage
As I continued to work on my chatbot, I learned about GCP’s newest model, Gemini. I decided to test how to achieve similar results while staying fully within the GCP ecosystem. Here’s what I did:
Prepare your knowledge base
Organize your website’s content into a structured format, such as a CSV file, including FAQs, blog posts, and service descriptions. Ensure that the CSV file has two columns: one for questions and another for corresponding answers.
Upload the CSV file to Google Cloud Storage for easy access. Due to the size of my file and for simplicity reasons, I decided to leverage Google Cloud Storage. As your data grows and for better performance, it could be better to have that data stored in a database instead.
Modify the Cloud Function code:
Update the existing Cloud Function code to handle the new functionality, which would involve these steps:
Retrieve the user’s question from the Dialogflow request.
Load the knowledge base CSV file from Google Cloud Storage.
Find the most relevant answer to the user’s question by comparing it against the questions in the knowledge base. You can use techniques like cosine similarity or other matching algorithms. I leveraged Google Cloud Platform Vertex AI, particularly the Embeddings for Text technique, to transform the user requests and my knowledge data into embeddings before leveraging the scikit-learn cosine similarity algorithm to search for the closest answer in my document.
This course was really helpful for me in learning more about Vertex AI and semantic search within GCP.
4. Pass the user’s question and the best-matching answer as context to the Gemini model and leverage the Gemini model to generate a well-formatted and contextually appropriate response based on the provided context.
5. Return the generated response to Dialogflow in the required format.
The exact code for this approach can be found in this GitHub repository as well as the dependencies file needed (approach2-requirements.txt).
For people who want to fully utilize this approach, they can follow the same steps as in Approach 1 from the “Set up Dialogflow to call the Cloud Function” section onwards. The main difference lies in the Cloud Function code, which incorporates the knowledge base and the Gemini model. This approach involved more setup and coding compared to the first one, but it provided the added benefit of staying within a single ecosystem. It personally allowed me to learn more about matching algorithms as well as Gemini model.
Tips and Troubleshooting:
Make sure to configure your Cloud Functions to handle your knowledge data. If reaching the maximum memory allocation for your function, you can either increase the memory (which can become costly) or batch the user embeddings section of the code to load the data by batch rather than the entire file in one go.
Review your knowledge data to ensure no empty lines in the CSV file are present, for example. This will avoid having to handle these scenarios in your code, as I had to do, making it even more complex.
Approach 3: Zapier Chatbot
After spending time coding the backend of my chatbot, I received a newsletter from Zapier (which I leverage on other projects) about their new chatbot features. The setup reminded me of OpenAI’s ability to build a custom chatbot, with the added benefit of clicking “Embed” once configured and getting the code for your chatbot to add directly to your website.
This was exactly what I needed when I started this small project, and I felt a bit annoyed at myself for not discovering it earlier. However, I learned a lot in the process, which I’m now sharing with you.
Here’s how you can build a chatbot using Zapier:
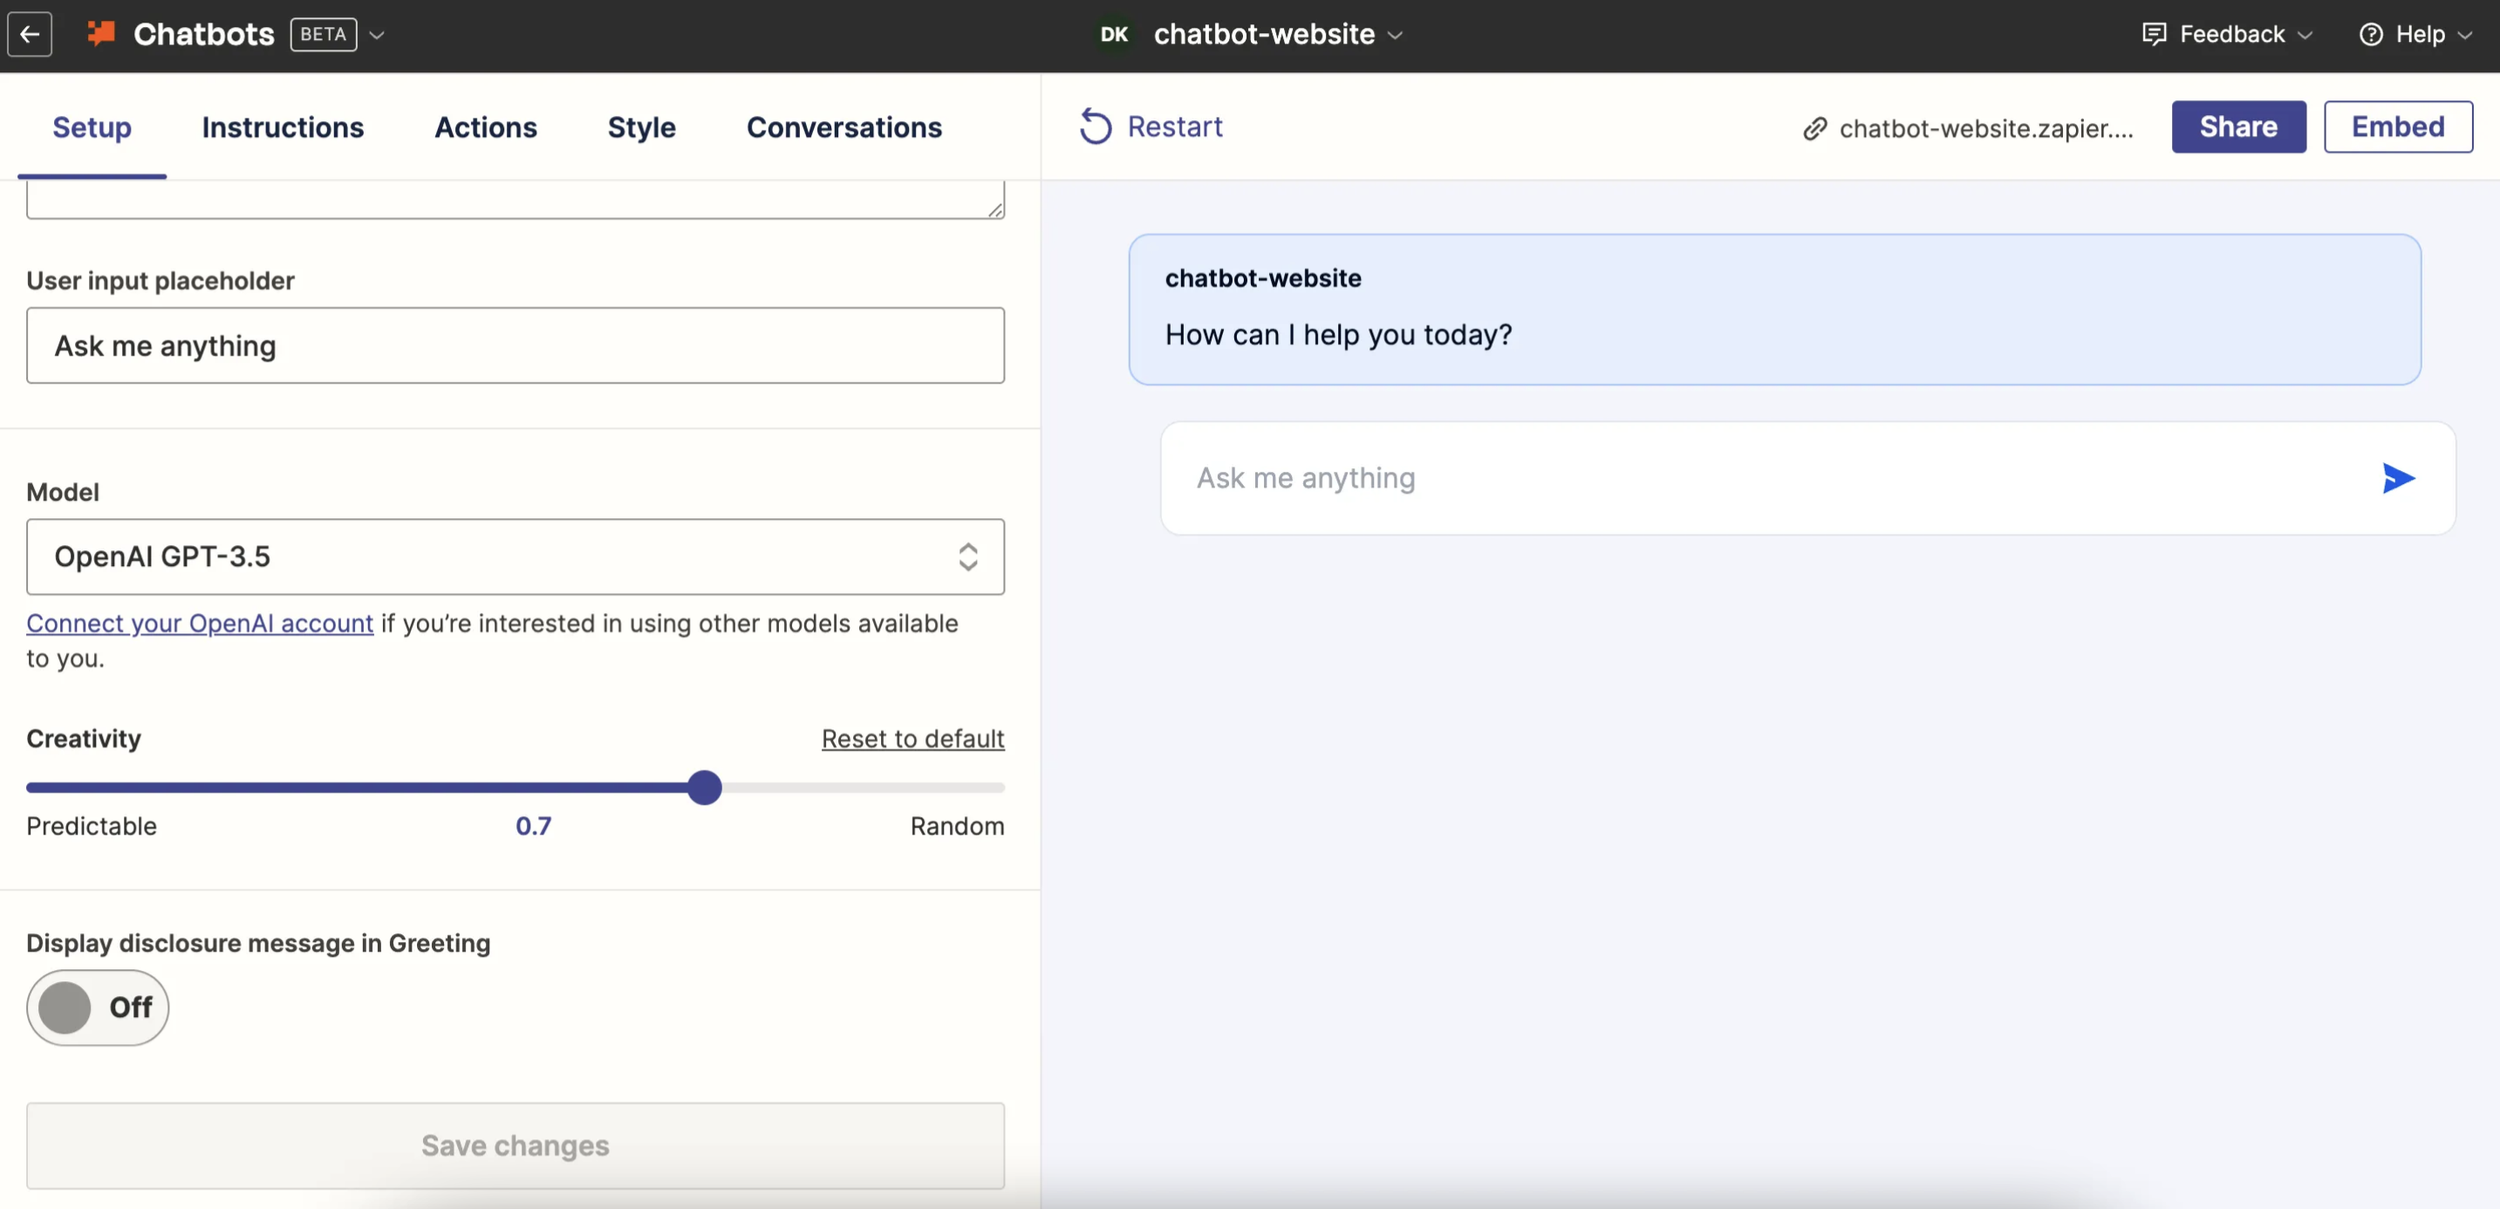
Sign up for a Zapier account and navigate to the Chatbots page. You can find more details on how to get started in building your own chatbot with Zapier here.
Create and customize your chatbot. You can connect to your own OpenAI account if you want to leverage additional features that are accessible to you (for example, if you have a membership with Openai, which allows you to leverage DALLE). At the time of writing this blog, the default and only model available is GPT 3.5.
3. Customize your chatbot by adding directives/instructions and adding your knowledge document. I used the same one created in Approach 1.
4. You can customize the chatbot by adding actions, updating its style, and changing how it replies to user requests. The added benefit of Zapier Chatbot is the ability to add actions, such as sending an email, which can enrich your chatbot without having to code.
5. Embed Your Chatbot Into Squarespace (or your own website/application):
Once your chatbot is ready, click on the “Embed” button and copy the provided code snippet.
In your Squarespace website, go to “Settings” > “Advanced” > “Code Injection”.
Paste the code snippet into the “Header” section and save the changes, just like in Approach 1.
While the model available in Zapier (GPT-3.5) might not provide responses as well as the first two options since it won’t leverage the latest model yet, it’s still a great solution for those who want to leverage a GPT-type model with knowledge for their chatbot without coding.
Conclusion
In this blog post, I shared three different approaches to building a personalized chatbot for your website, each with its own advantages and considerations. I started working on something, dove into it and learned valuable lessons that I decided to share with you. The key takeaway is that there are multiple ways to create a deeply personalized chatbot that can provide better answers by understanding your business and expertise rather than relying on generic responses. I hope this blog post will be helpful for anyone looking to enhance their website with a custom chatbot. Feel free to share your approach!


